Bento Box Block Tutorial
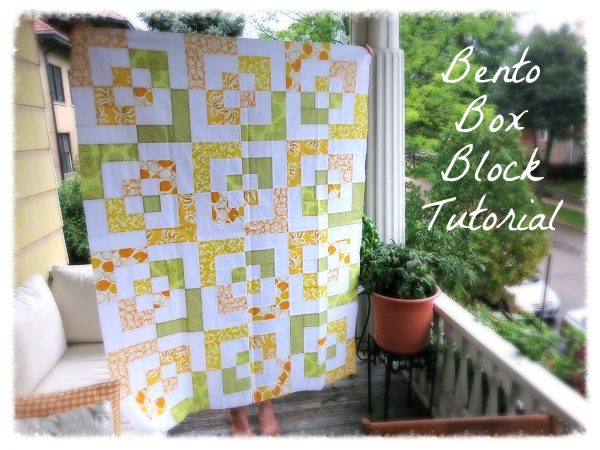
Bento Box blocks create a really amazing pattern once they're arranged into a quilt. What looks like a complicated layout is really very simple.
In this tutorial, I'll show you how to make 4 Bento blocks at once. It's my preferred method because it's much faster than making 4 separate blocks.*
Unfinished Block Measurements: one 16"x16" block cut into four 8"x8" blocks
Choose 3 fabrics and cut pieces in the following sizes:
Fabric A (center):
1 – 6”x6”
Fabric B:
2 – 3”x6”
2 – 3”x11”
Fabric C (can be the same as Fabric A):
2 – 3”x11”
2 – 3”x16”
(If you prefer (as I always do), cut fabrics B and C to be a little longer than 6", 11" and 16". This is my secret to getting a really accurate block. Trim off the extra after sewing your strips.)
Sew two pieces of Fabric B to either side of the center square. Use a scant ¼” seam allowance and press seams open (or to the side if you prefer). Trim off the extra bits.

Next, add the other two pieces of Fabric B and press seams:

Add Fabric C in the same way until you finish the block. It should measure 16”x16”.

Now comes the scary part...but this is also where you save a lot of time. Take your 16" block and cut it into four 8"x8" blocks. Be sure to measure twice, cut once!


At this point, simply rearrange your blocks and sew together to complete your quilt top.

As always, let me know if you have any questions.
*If you're really into why this method is faster, here you go:
Normally when you make a bento box, you assemble the 8” blocks individually like in this tutorial.
Each of those blocks has 5 pieces to cut and 4 seams to sew. To make four blocks, you cut 20 pieces of fabric and sew 16 seams.
To make all four blocks in my tutorial, you cut 9 pieces and sew 8 seams. Then you cut your block into four which just takes a second or two.
If we're simply looking at this in terms of time, cutting 9 pieces of fabric takes less time than cutting 20. The same goes for sewing 8 seams instead of 16.
This is amazing. You know so much more about sewing than I do, and I love picking up little tips and tricks like the ones you've listed here. I also love that you're jerky for not using patterns. I just can't read patterns because they look like a foreign language to me, so that probably makes me a jerk. Heh!
ReplyDeleteAnyway, thanks for the beginning of your bento box quilt tutorial. I definitely plan on tackling a quilt in the future, even if it is just a small square one that hangs on my son's wall.
geez, crystal, every time i read an entry in which you link i have to click on the link and then read that entry. and if in that entry, there are other links,of course i have to follow those, too. make no mistake, this is no fault of your entries, i have just taken such a liking to your persona and crafts that i have to read it all up :)
ReplyDeletenot quite clear on what a bento box quilt is since all the ones you liked looked a little different, but i have an idea. and haven't read this entry yet, so here i go.
hey, this looks really interesting. i look forward to reading more, so sew away!
my sewing instinct tells me to press the seams open, too, but the ragged squares quilt called for to the side. if you press it open, nah, the batting won't show through cause you'll have sewn it well.
i was amused to read that your perfectionism won't allow you to make a ragged squares quilt. RAGGED! ;) i'm enjoying the cozy hippyish style at the moment, so ragged is right down my alley.
thanks for the fabric price info, i'm a virgin there but also don't like paying too much.
how do i know if it's good fabric other than me thinking "hey, this looks like good fabric"?
will now check out purlsoho.com, ever been there?
i'm glad you're back from mexico, and thanks for all the photos :)
Allison,
ReplyDeleteThanks for the feedback...I was worried I'd bore people with all my "do this, do that, I'm a bossy know-it-all" post. I don't mean to be, it's just that when I was starting quilting I craved some real information. Some real advice. It's easy to find dry, pattern-like info but I wanted tales of firsthand experience, what to do and what not to do. So, that's what I'm trying to do. I'm happy to hear it's not too annoying.
I'm excited to see your (future) quilt. Quilting is very easy once you get the hang of it. It's like art mixed with math which, for me, is very comforting. And quilts are comforting...so, you know, it's an all around nice hobby.
Christine,
ReplyDelete"read it all up" That's nice! I'm so happy you like what I'm doing here. I'm perfectly content doing my own thing just for me but there's something about passing along information, helping people who are as eager to learn new things as I am...well, it's just really nice.
Yes, you're right, my block doesn't look like a bento box block yet. I devised a way to be more efficient but I'll post about that in the next installment.
I tried one time to press the seams to the side but it felt so wrong that I never tried again. I love the smoothness after pressing a seam open. It also makes matching seams so much easier. I'll explain my process for that too.
I was also worried about the batting showing through...or more than that, the thread ripping and the seam popping open (it just seems less protected for some reason). I don't worry about that anymore, though. After I quilt it, everything is very secure and if a seam does pop open, it would be pretty easy to fix. Also, washing and drying the quilt really tightens things up.
Ugh, ragged...I cringe! Maybe I'll make one for my brother and his fiance. They're the free-spirit type and maybe the raggedness won't stir up chaos in their brains like it does in mine. I do like yours, though. Very nice!
Oh, about the fabric. My non-expert advice is this: if you can buy it in person, do. Feel the thickness...if it feels like it'd rip if you tugged hard enough then it's no good. If you can see a lot of light through it then I also think it's no good.
If you can and you don't freak out like I do, go to a local quilt shop instead of a chain store like JoAnns. I feel too much pressure going into those small stores (a touch of social anxiety) but they usually have much better stuff. If you do go to a chain, feel the fabric and judge for yourself. I've bought plenty of good fabric at JoAnns but I would never buy from the online store.
If you order online, my only suggestion is to go with what you know will be good. I hate being one of those people who only buy "designer" fabric but it's an easy way to get quality fabric without touching it first. It's expensive but worth it.
I especially like Free Spirit and Michael Miller fabrics.
http://www.freespiritfabric.com/
http://www.michaelmillerfabrics.com
Hope this helps. :)
Good info. I don't know how you could impart directions without "do this" and "do that" although you could say "this is what works for me" or "this is the way I do it. Feel free to do it your way." Personally, I'm always tickled to get tips and tricks from others who are knowledgeable and you certainly are. Definitely not a "bossy know-it-all," just Crystal with stuff to share to make quilting easier or more interesting for others. I'm loving it except this is going to take hours as I chase down all the links. Suppose I don't need to be so curious!
ReplyDeleteA very good color combination.
ReplyDeleteI know this is an old post, but can I just give a big THANK YOU for the "do this" and "do that"?
ReplyDeleteI LOVE having explicit instructions.
I think I'm going to use this pattern to make a sock monkey quilt.
Thank you for this quick bento box quilt trick. My very first quilt was a bento box the old way, one smaller block at a time, and it went fast, but this is going to be lightning fast! Going to try to do one in a weekend as a challenge! :)
ReplyDeleteHave you posted a picture of the finished quilt anywhere? I could not find it on your blog. I would love to see it. I've amassed the fabrics to make a bento box quilt. I would love to see your finished quilt to help me decide whether to use the traditional design or vary the colors of the inner square and outer border. Thanks for all of your great advice and enticingly colorful pictures.
ReplyDeleteThank you SO MUCH for this SIMPLE tutorial! I have been doing some math so I can make a baby sized quilt with 4, 20 inch blocks. I have resigned myself to being mathematically challenged! Would you be able to help me figure this out? I am so excited to get started! I have the perfect baby fabric too!
ReplyDelete